Orizome, Japanese Fold Dyeing
December is just around the corner, and the holiday season has finally begun. We would like to introduce “Orizome -Fold Dyeing”, which is perfect for this season.
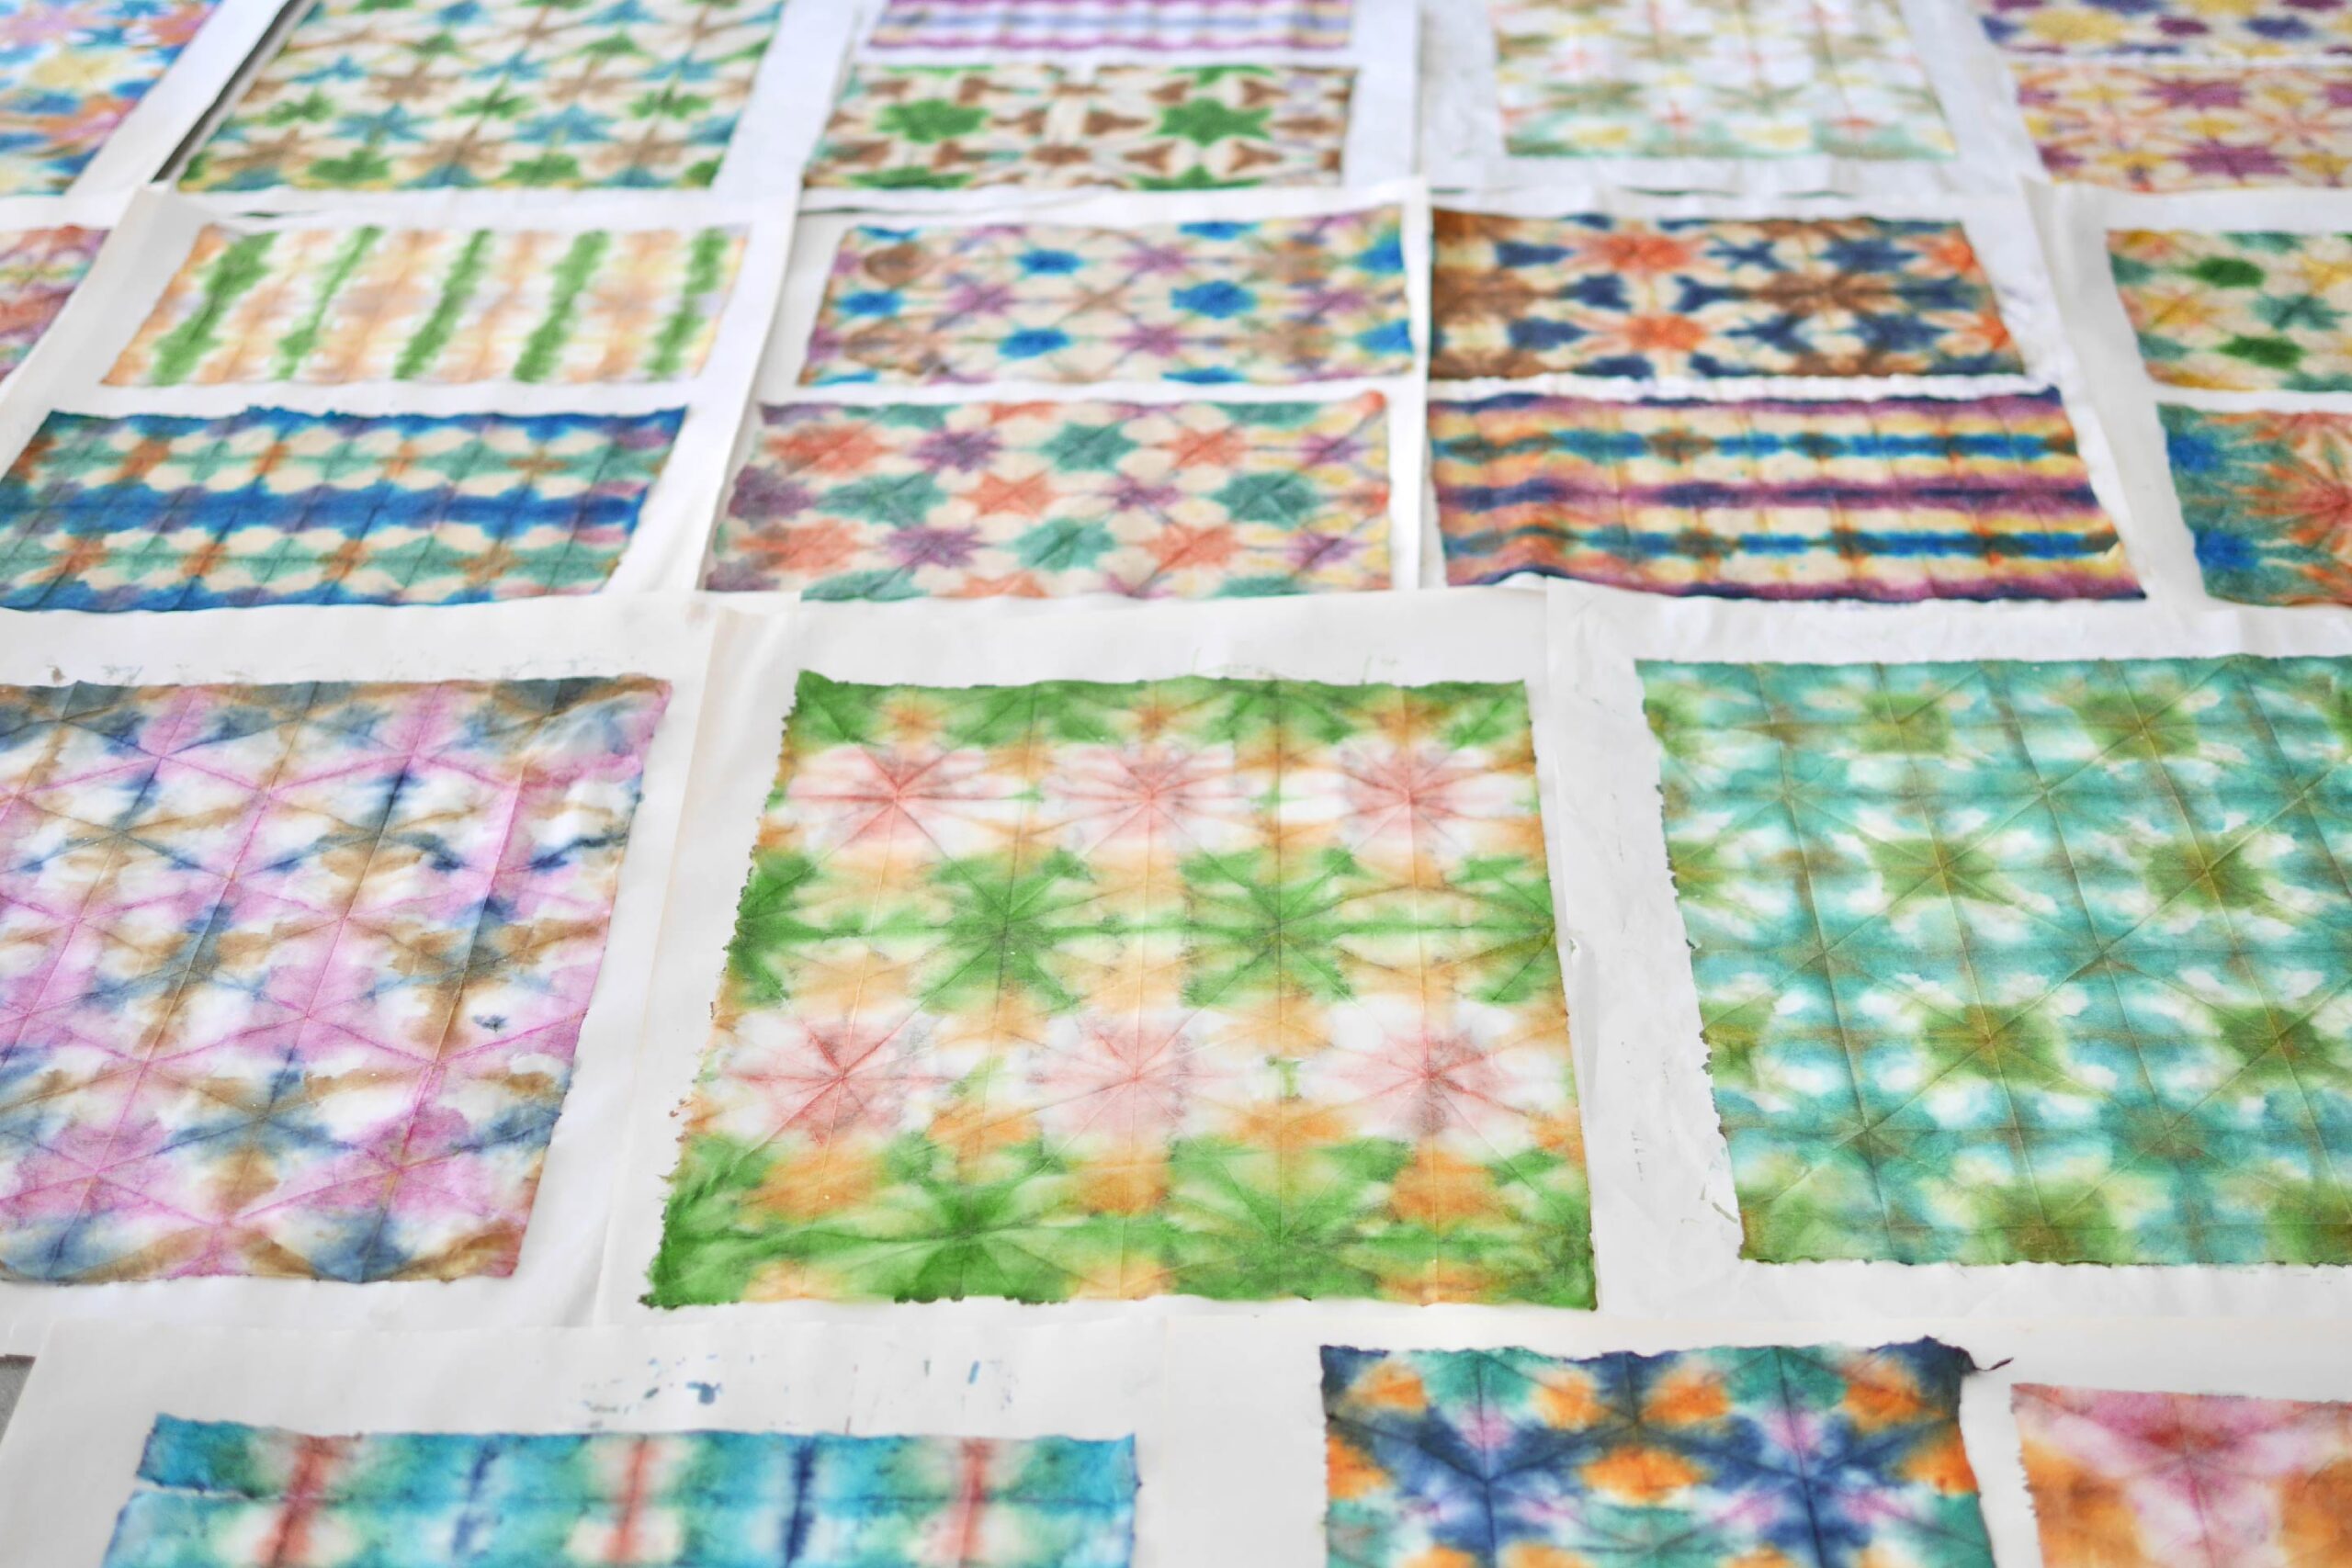
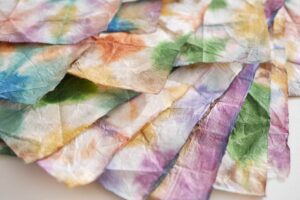
Orizome is a Japanese dyeing technique. This simple and fun dyeing play begins by folding paper into geometric shapes. Such as triangles or squares and dipped into ink to be dyed like tie-dye style or wet-in-wet(wet paint or water is added on top of wet paint on the paper). By dipping every inch of the paper into the dye, a beautiful pattern along the folds is created. The unexpected colors and shapes that unfold when the paper is opened are a surprise.
We love this project and it has been a staple of ours for the past few years to dye for the holiday season. It’s also fun to see that when we are done, even our hands are dyed and look like zombies.
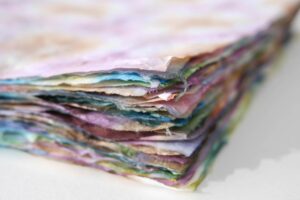
This dyed paper is very versatile and can be used to wrap gifts, make envelopes, and many other uses. I always keep a stock of this paper on my shelf for when I want to add a little something extra to a gift. I will give you more ideas on how to use these Orizome paper in the next post. Whenever I introduce this technique, I am always asked about the materials used so I will note the materials in detail.
I hope you will try this technique at the end of the year.


Materials
– Japanese paper, Mulberry paper, Calligraphy paper
– Ink *Watercolor, acrylic, food color, etc.
– Rubber bands or string *if necessary
Here is a helpful folding guide. Please download and use it.
download the folding guideInstructions for making
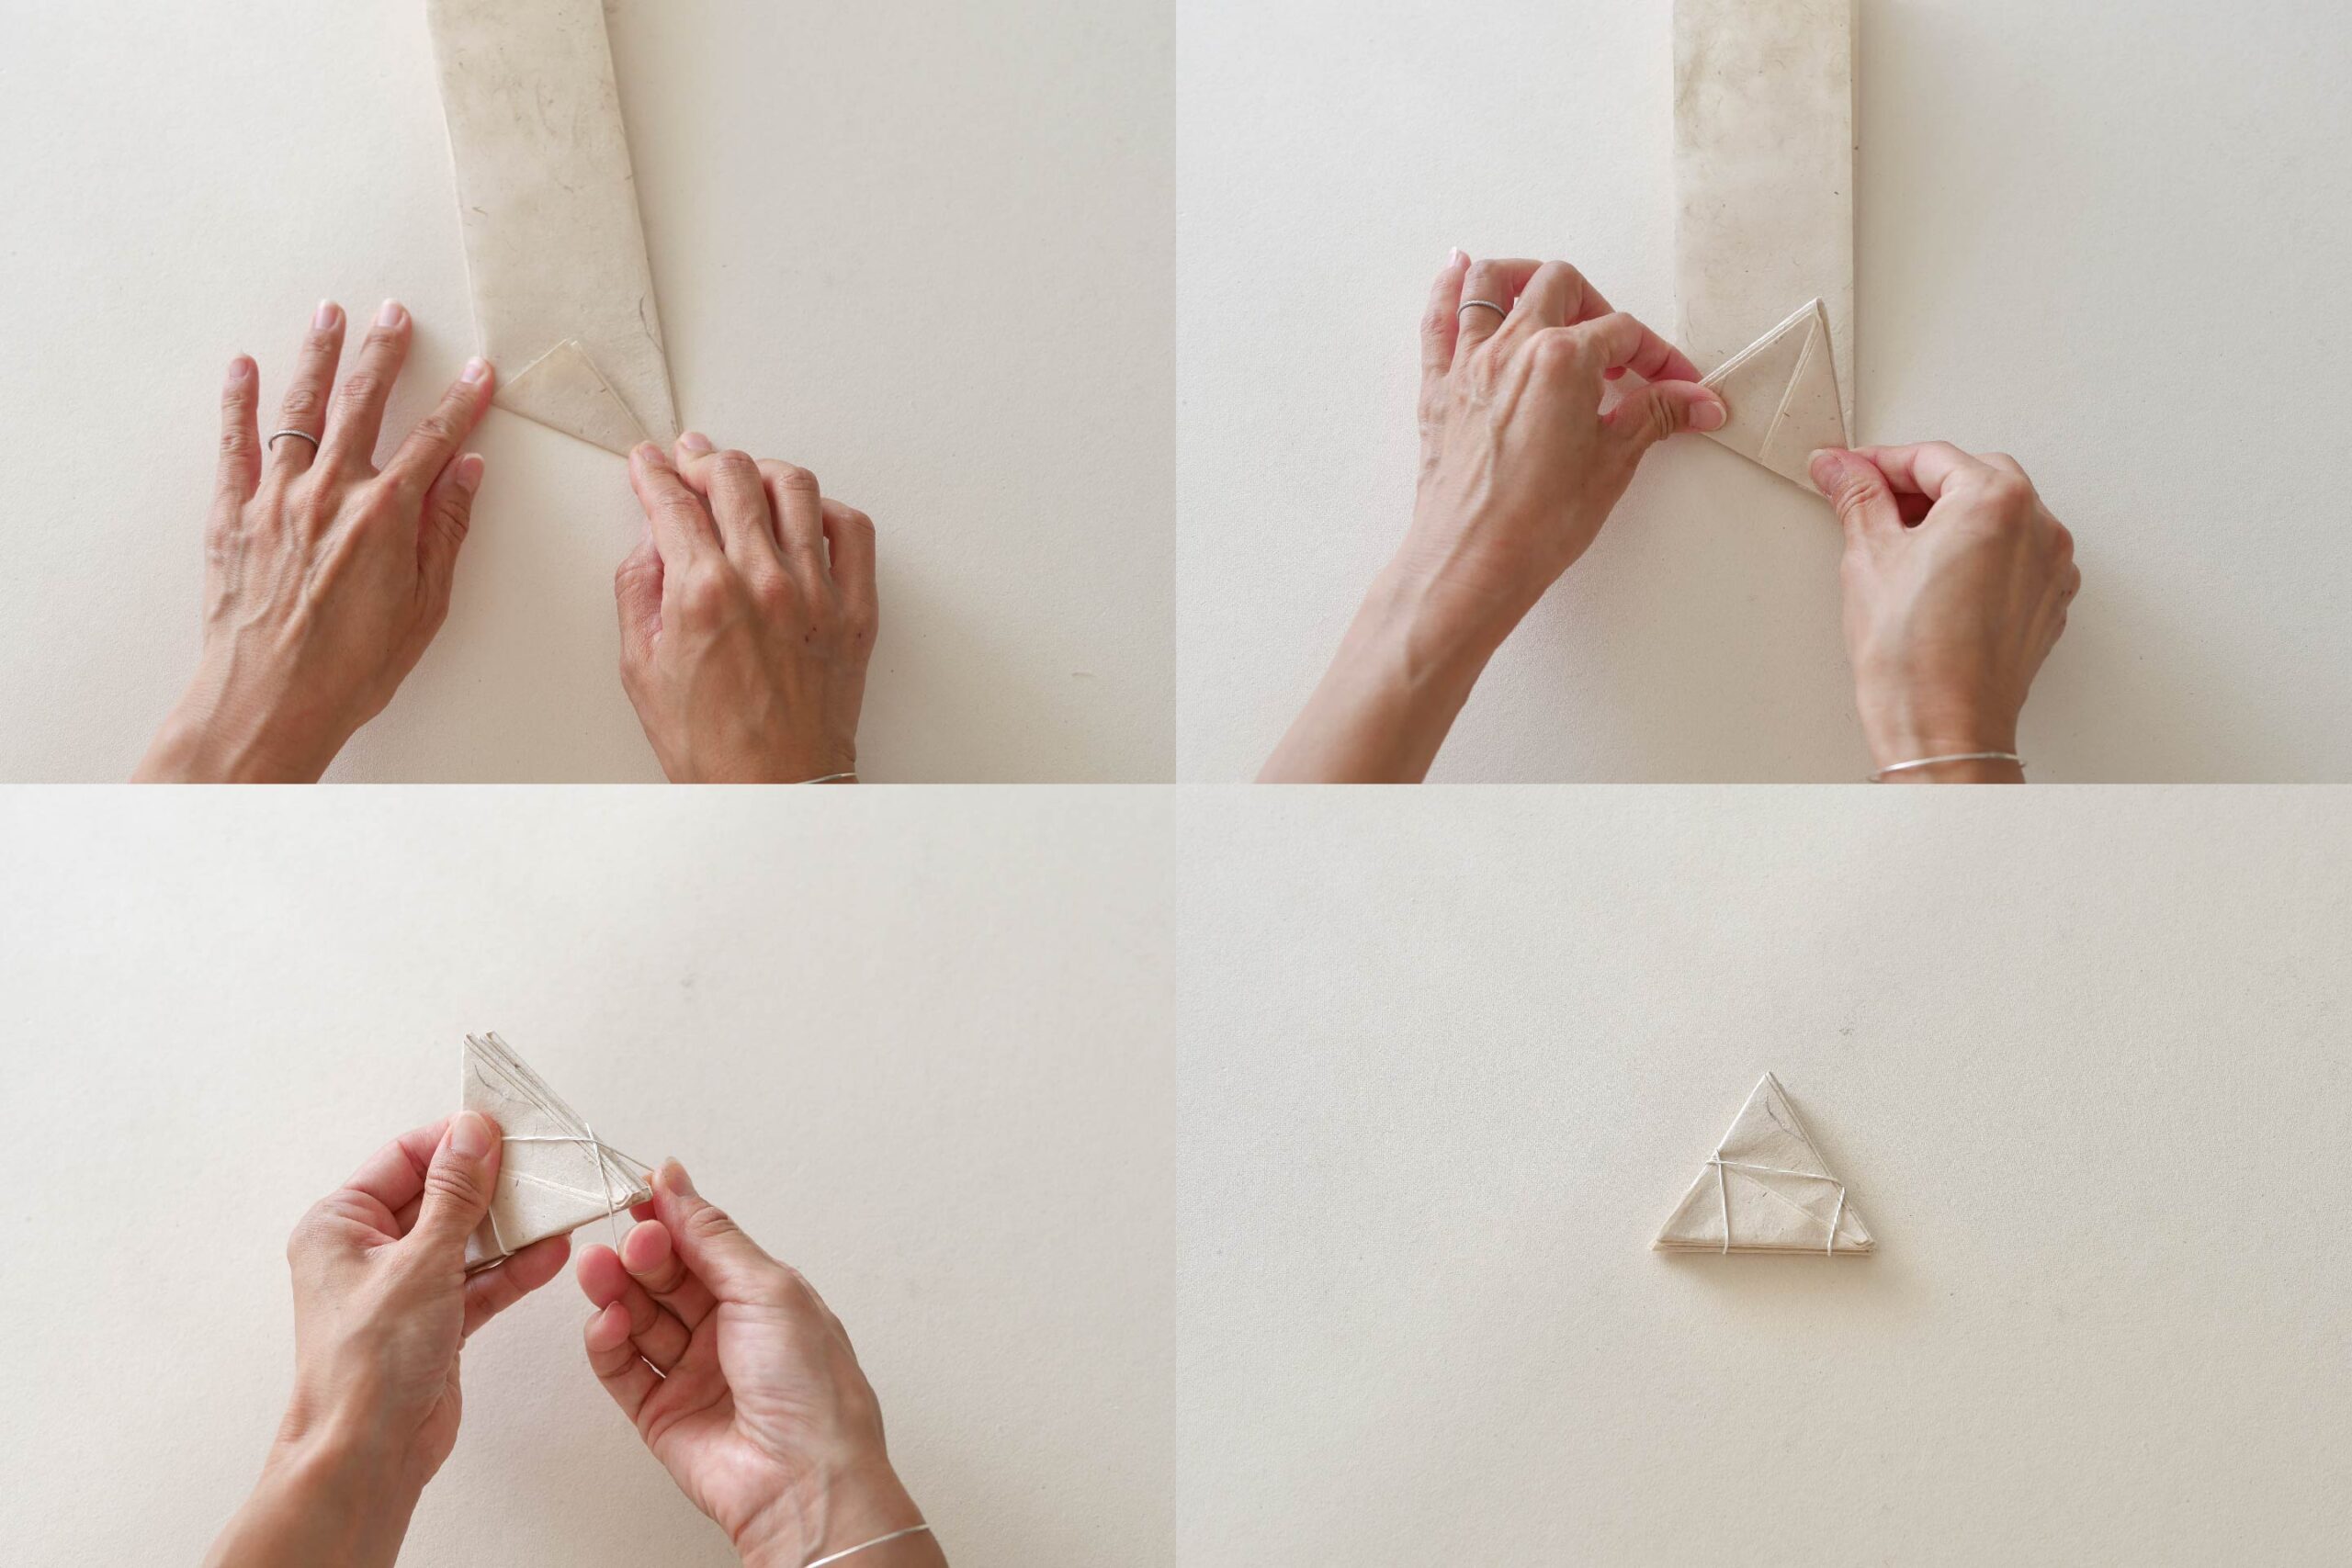
Step 1. Fold the Paper
Fold the paper into a bellows. Please refer to the Folding Guide. Triangle, square… Depending on how you fold, the pattern when opened will change. Please try different folding methods. If the paper spreads out, you can use string or rubber bands to hold it in place.
Step 2. Soak the Paper in Water
Soak the paper so that the water is fully absorbed. This will make it easier for the ink to soak through. After soaking in water, drain off the water by holding it down gently with both hands.

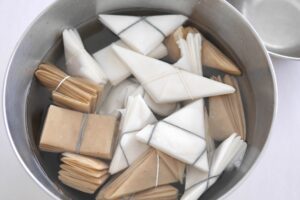
Step 3. Dye the Paper
Dye freely in any color you like. If you dye every corner and every edge, the overlapping colors will spread out like a pattern. If you dye only the edges, the lines become a distinctive design. If you dye only the corners, you will get a different pattern.
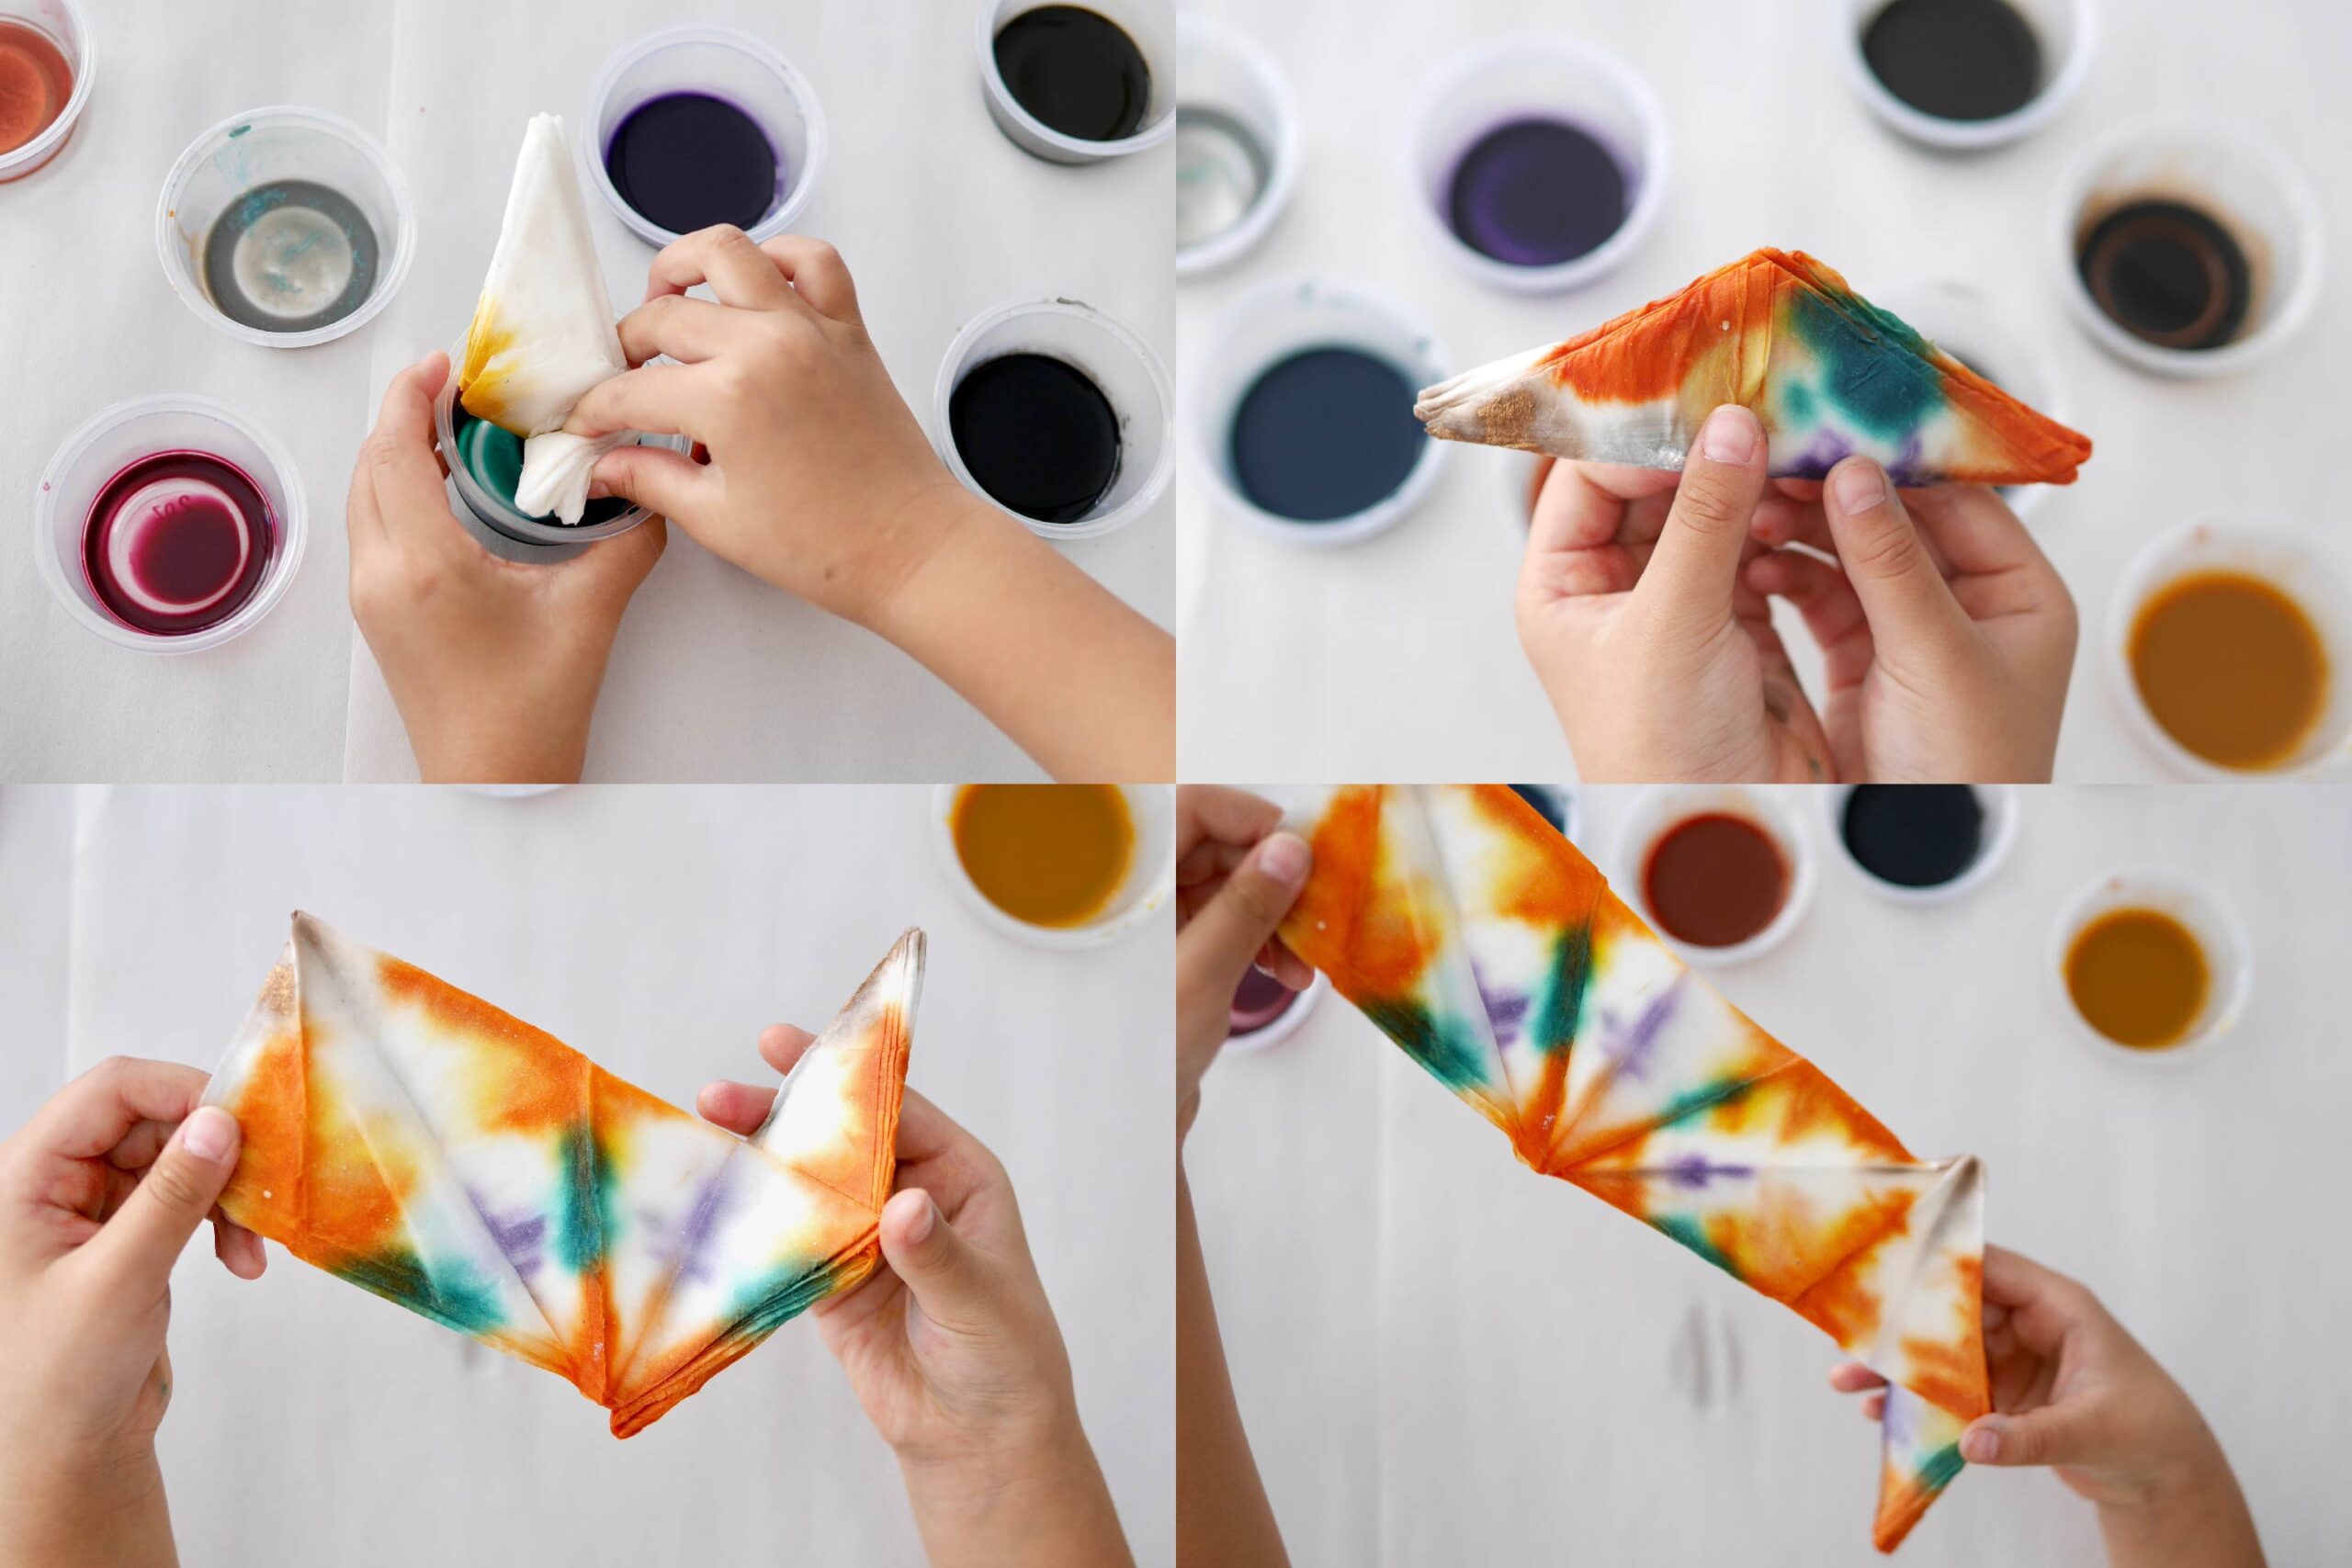
Step 4. Spread and Dry the Paper
Spread the paper. If the paper is too wet, it will tear easily when spread out, so before spreading out the paper, use kitchen paper to cover the excess moisture. Then spread it out gently and slowly.
Let it dry and it is ready to use. As it dries, the color will settle. The density of the ink can be changed according to your preference.
About Materials
About Paper
The choice of paper is a difficult one. If it is too thin, it tears easily, and if it is too thick, it is not suitable for folding and dyeing work. I usually use Mulberry paper, calligraphy paper, or shoji paper. I recently tried this paper, which was my favorite because of its raw base color. When I tried it, I was concerned that it might be a little thicker and difficult to dye, but it actually soaked up water well, which was a pleasant discovery and perfect for this project.
About Ink
Any ink can be used. You can use watercolor or acrylic paint dissolved in water, or an easy-to-use liquid watercolor ink. I prefer to use ACRYLIC INK by liquitex. I especially like the Transparent and Muted series. I like the transparency and the calm, natural colors.
Of course, these materials are just ideas and can be done with other materials. My friend dyed with food ink and kitchen paper that she had at home and it turned out wonderfully. I think it is very nice to be creative with what you have around you.
Orizome, Japanese Fold Dyeing
12月が目前に迫り、いよいよホリデーシーズンがはじまりました。この季節にぴったりの”折り染め”をご紹介します。
折り染めとは、日本の染色技術のことです。このシンプルで楽しい染色遊びは、紙を幾何学的に折りたたむことから始めます。そして三角や四角に折った紙をタイダイやにじみ絵のようにインクに浸して染めていきます。隅々まで染料に浸していくことで折り目に沿った美しい模様が生まれます。紙を開いた時に広がる思いがけない色や形は驚きを与えてくれます。
私たちはこのプロジェクトが大好きで、ホリデーシーズンに向けて染めるのがここ数年の定番になっています。終わった後は、二人の手まで染まってゾンビの様になっているのも楽しいものです。
この染めた紙はとても万能で、プレゼントを包んだり、封筒にしたり、用途は様々です。私はいつもこの紙を棚にストックしていて、贈り物になにかひとつ手を加えたいときに重宝しています。使い方のアイデアは次回詳しくご紹介します。また、この技法を紹介するといつも材料についての質問をいただきます。今回は使っている材料も詳しくご紹介しますので、ご参考にしてください。
ホリデーシーズンを彩る折り染め、一年のしめくくりにぜひお試しください。
用意するもの
– 和紙
– インク *水彩、アクリル、フードカラーなど
– 輪ゴム、もしくは紐 *必要であれば
こちらが折り方ガイドです。ダウンロードしてお使いください。
download the folding guideつくりかた
Step 1. 紙を折る
和紙を蛇腹に折る。折り方ガイドを参考にしてください。三角形、四角形…折り方によって、開いた時の模様が変わるので、ぜひいろいろな折り方を試してみてください。紙が広がってしまう場合は、紐や輪ゴムで止めておくといいでしょう。
Step 2. 紙を水に浸す
紙に水分が十分に行き渡るように浸します。そうすることによってインクが染み込みやすくなります。水に浸したら両手で軽く抑えて水気を切ります。
Step 3. 紙を染める
好きな色に自由に染めます。すべての角、辺の隅々まで染めると色の重なりが模様のように広がります。辺だけ染めると、線が特徴的な模様に。角だけ染めるとまた違った模様になります。
Step 4. 紙を広げて乾かす
紙を広げます。紙が濡れすぎていると、広げるときに破れやすくなるので、紙を広げる前にキッチンペーパーなどで余分な水分を押さえます。そして優しくゆっくりと広げます。
乾かしたら完成。乾くと色味が落ち着きます。インクの濃さはお好みの濃度で変えてください。
材料について
紙について
紙の選択は悩ましいですね。薄すぎると破れやすいし、厚すぎると折りや染めの作業に適さない。わたしはいつもマルベリーペーパー、書道用の半紙、障子紙などを使っています。最近試したこの紙は、地色が生成りで私好みでした。試してみると、少し厚めで染まりにくいかと懸念しましたが、実際には浸水性がよく、このプロジェクトにぴったりで嬉しい発見でした。
インクについて
インクはなんでも構いません。水彩絵の具やアクリル絵の具を水に溶いて使ってもいいですし、使いやすいリキッド状の水彩インクでもいいですね。私が好んで使っているのは、liquitexのACRYLIC INKです。特にTransparentシリーズとMutedシリーズがお気に入りです。透明度が高く、落ち着いた自然な色味が好きです。
もちろん、これらの材料はアイデアの一つで他の材料でもできます。お友達は、家にある食品用インクとキッチンペーパーで素敵に染めていました。身近にあるもので工夫するのはとても素敵なことだと思います。